

New Relic
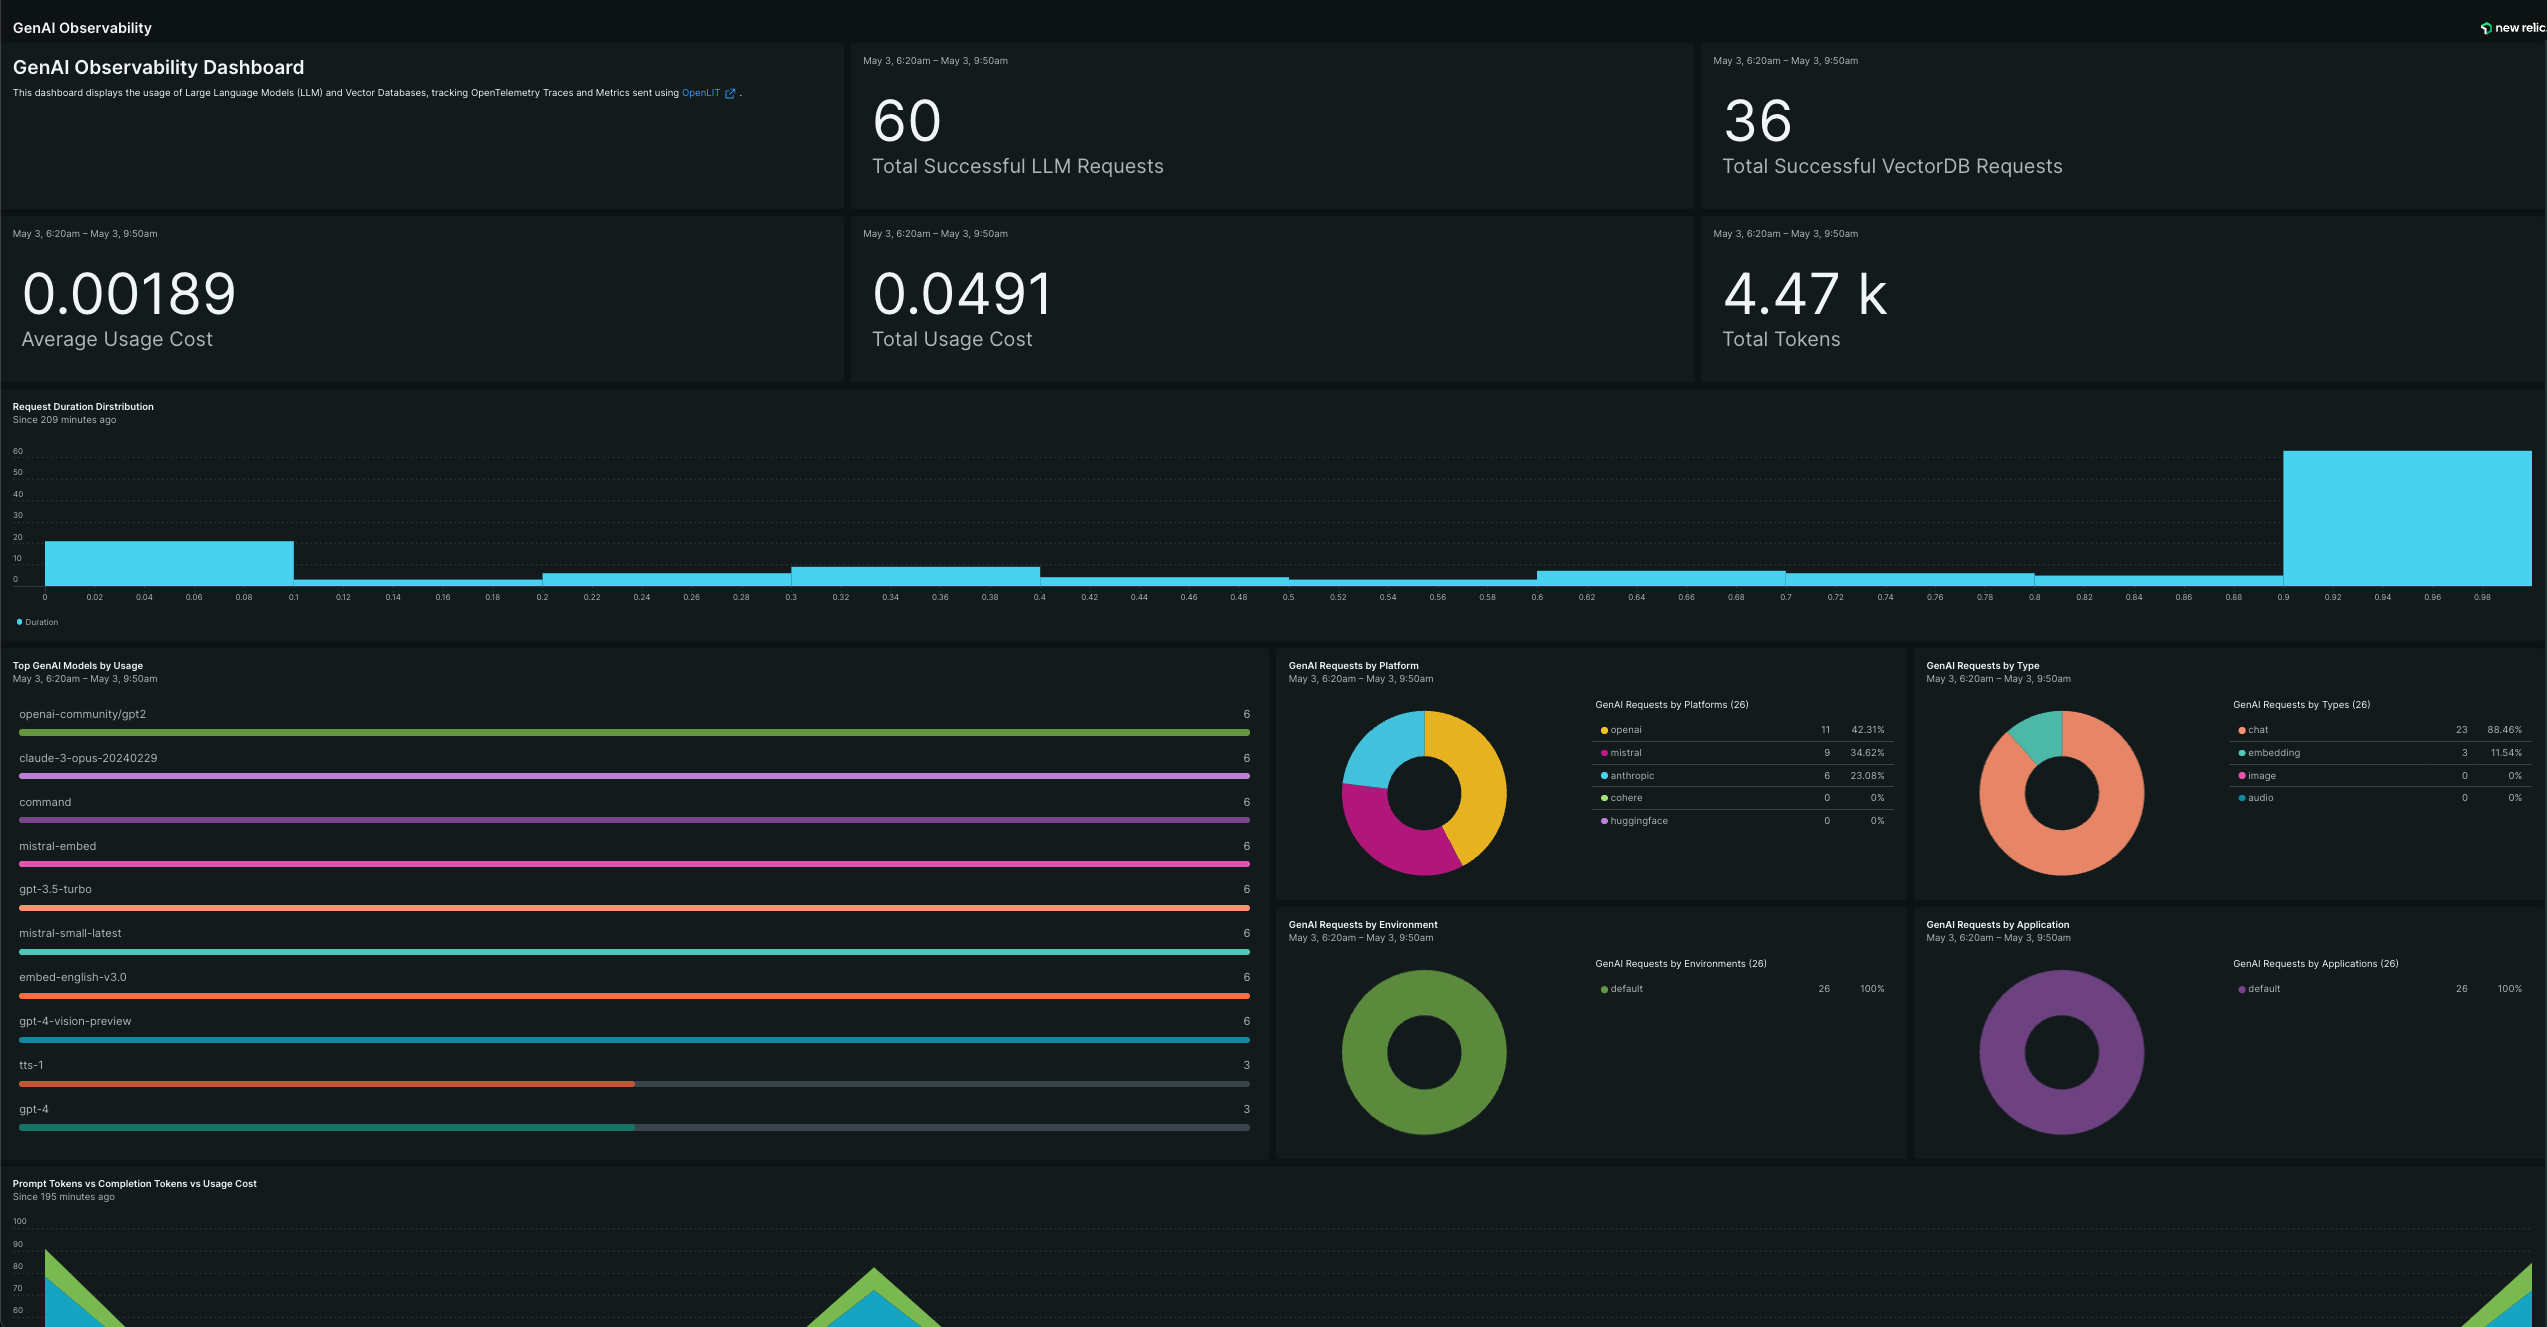
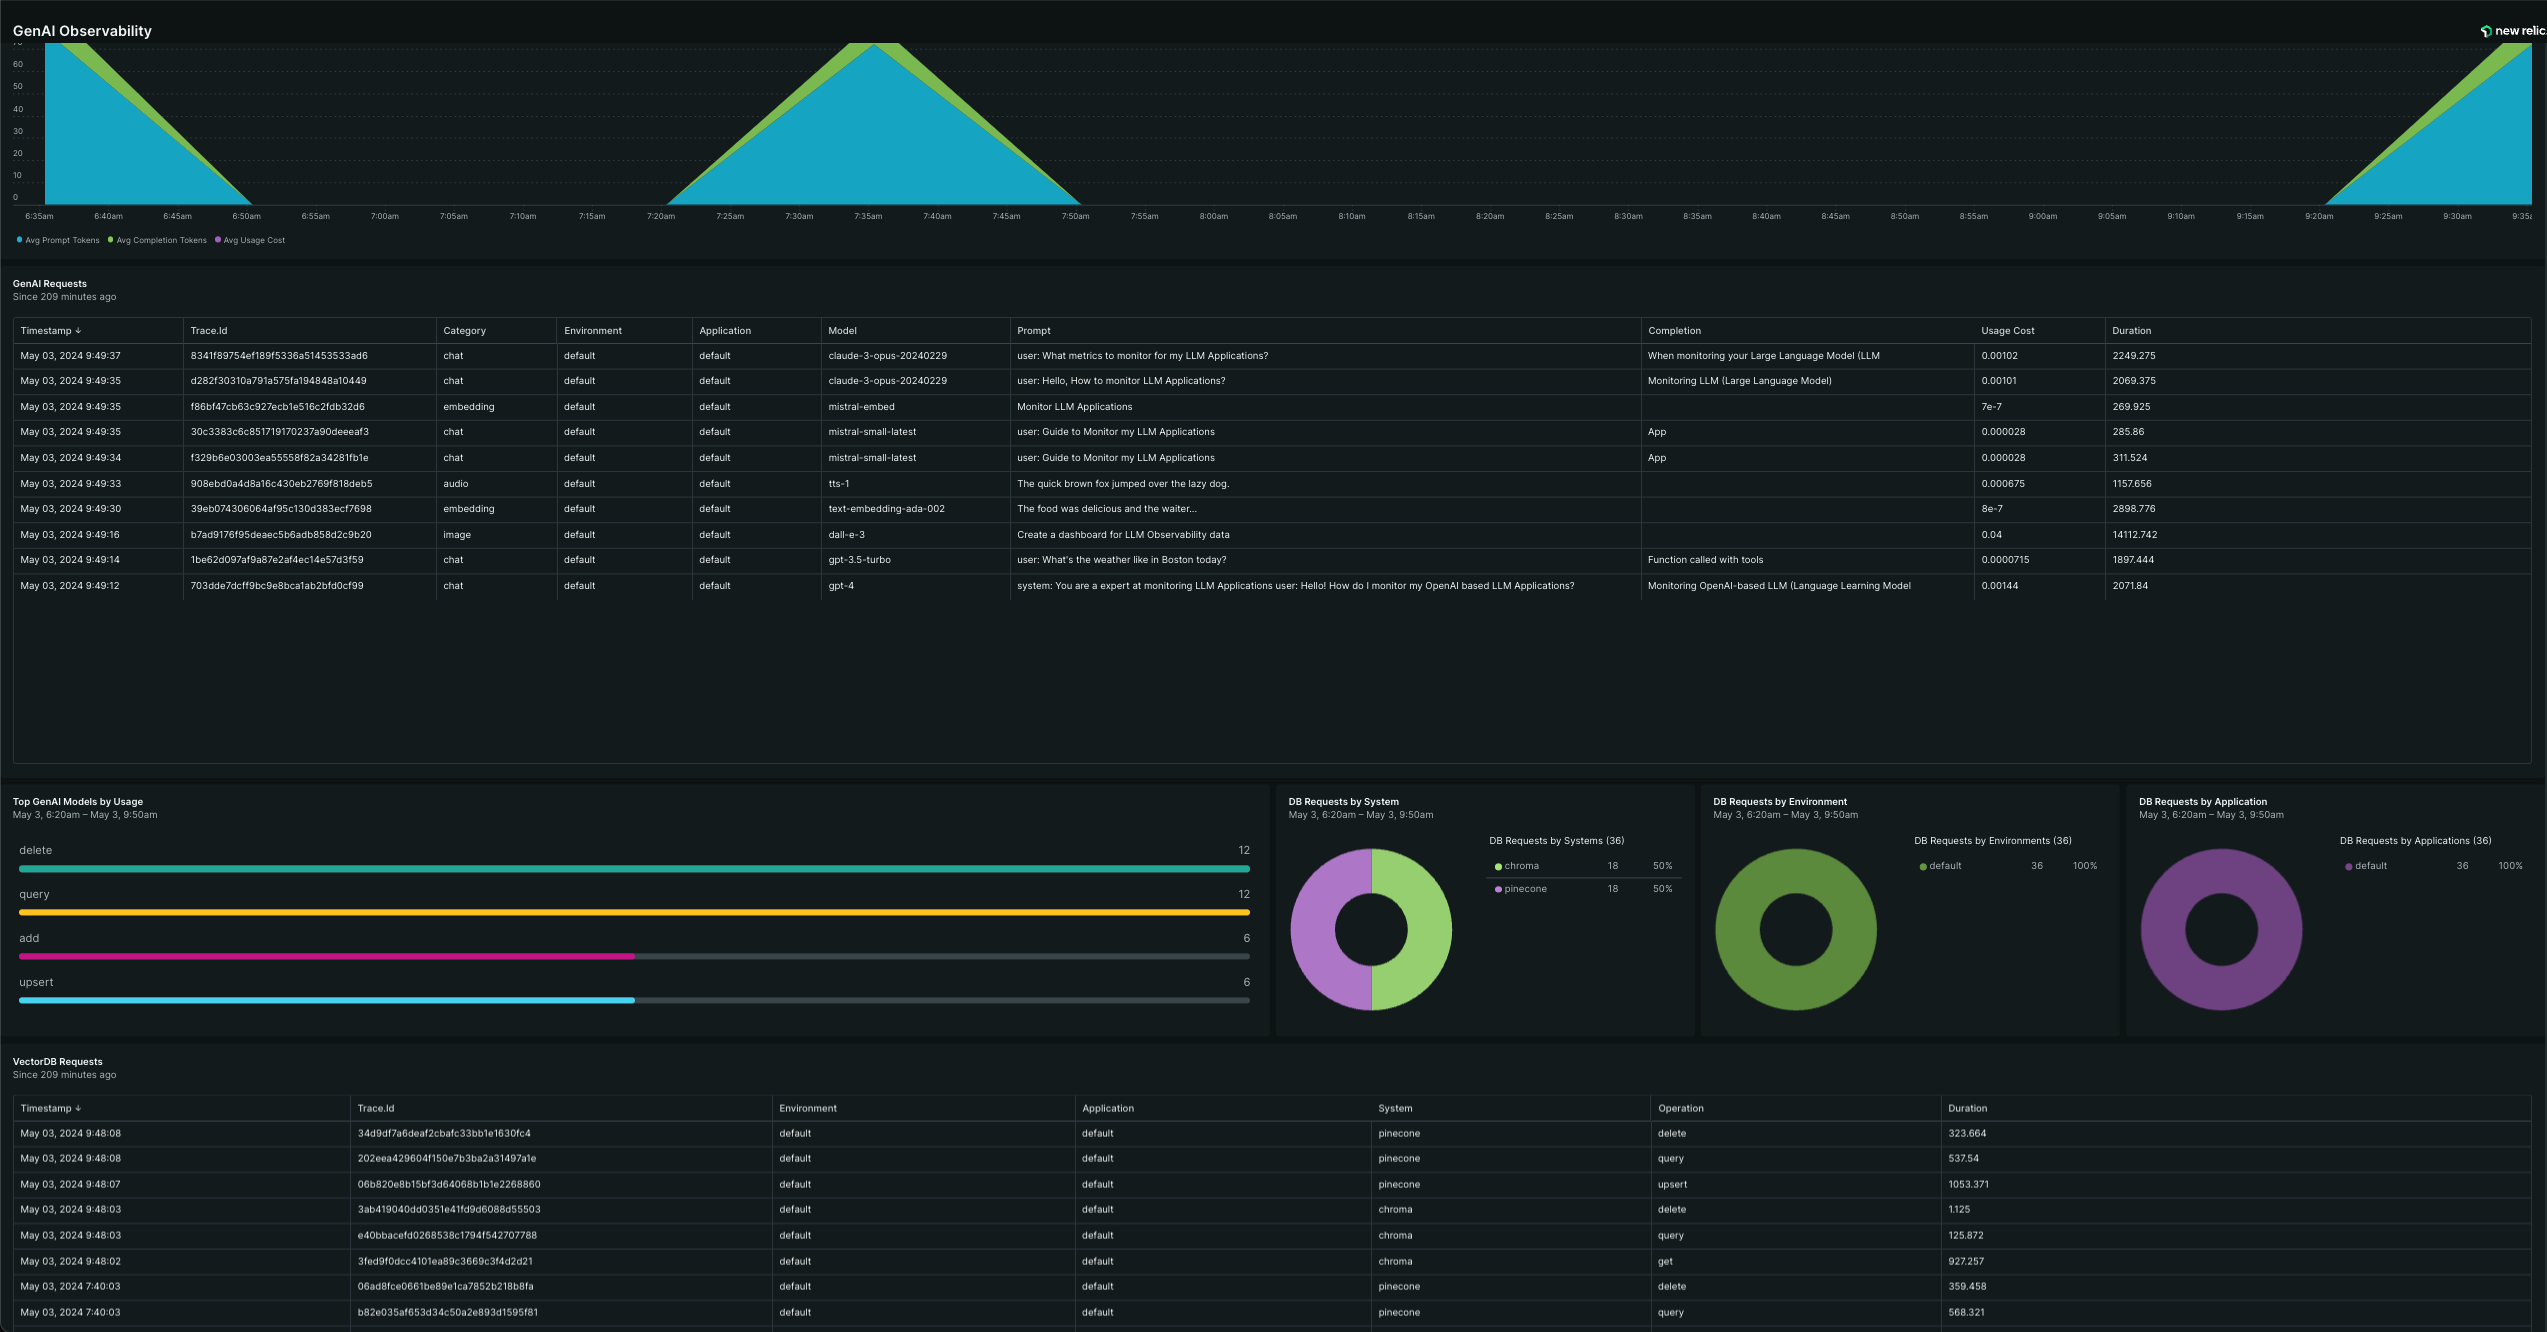
To directly send OpenTelemetry metrics and traces generated by Shield360 from your AI Application to New Relic, follow the below steps.
1. Get your Credentials
- Go to the New Relic API Keys UI Page
- Click Create a Key Button
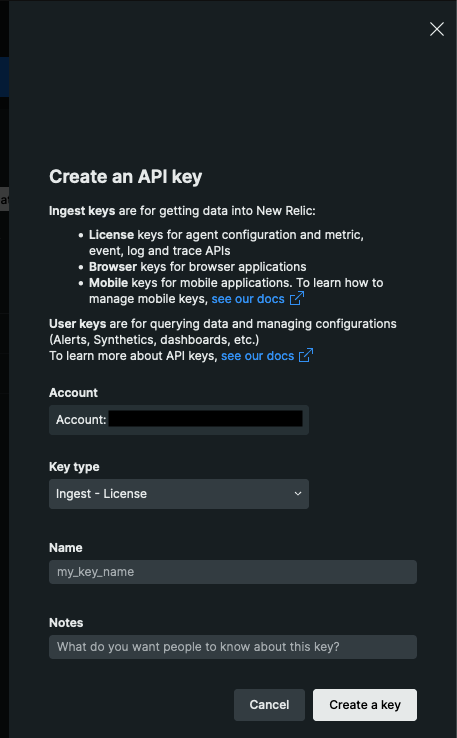
- In the Create an API Key Wizard:
- Set Key Type as
Ingest - License - Give the API Key Name, for example
shield360and optionally add any Notes - Click on Create a Key
- Set Key Type as
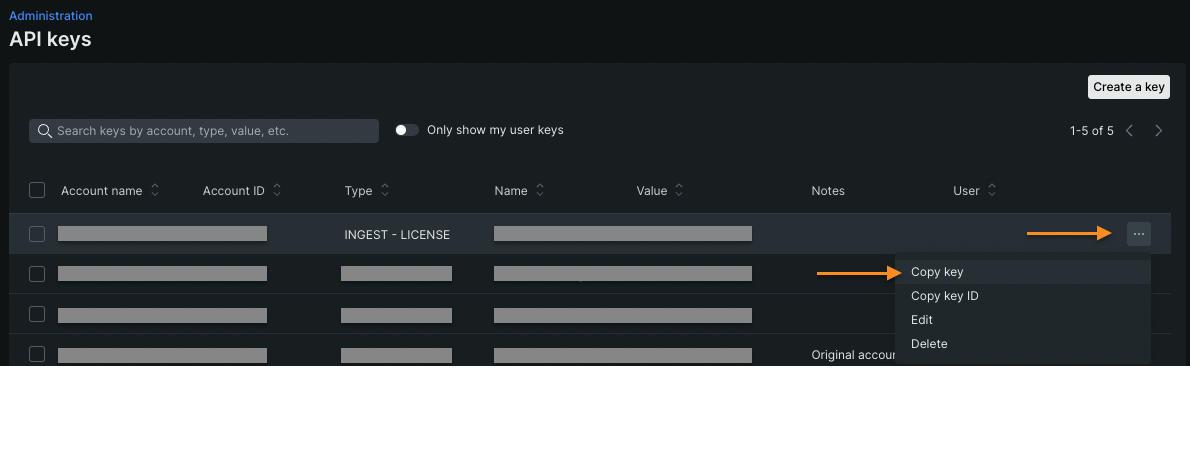
- Copy the key by clicking on the three dots (…).
2. Instrument your application
For direct integration into your Python applications:
import shield360
shield360.init(  otlp_endpoint="https://otlp.nr-data.net:443",  otlp_headers="api-key=YOUR_NEWRELIC_LICENSE_KEY")
Replace:
YOUR_NEWRELIC_LICENSE_KEYwith the API Key value you copied in Step 1.- Example:
api-key=acxxxxxxxx
- Example:
import shield360
shield360.init()
Set these environment variables:
export OTEL_EXPORTER_OTLP_ENDPOINT="https://otlp.nr-data.net:443"export OTEL_EXPORTER_OTLP_HEADERS="api-key=YOUR_NEWRELIC_LICENSE_KEY"Replace:
YOUR_NEWRELIC_LICENSE_KEYwith the API Key value you copied in Step 1.- Example:
api-key=acxxxxxxxx
- Example:
Refer to the Shield360 SDK configuration reference for more advanced configurations and use cases.
For zero-code auto-instrumentation via command line:
# Using CLI argumentsshield360-instrument \ --otlp-endpoint "https://otlp.nr-data.net:443" \ --otlp-headers "api-key=YOUR_NEWRELIC_LICENSE_KEY" \ --service-name "my-ai-service" \ --deployment-environment "production" \ python app.pyReplace:
YOUR_NEWRELIC_LICENSE_KEYwith the API Key value you copied in Step 1.- Example:
api-key=acxxxxxxxx
- Example:
# Set environment variables (takes precedence over CLI args)export OTEL_EXPORTER_OTLP_ENDPOINT="https://otlp.nr-data.net:443"export OTEL_EXPORTER_OTLP_HEADERS="api-key=YOUR_NEWRELIC_LICENSE_KEY"export OTEL_SERVICE_NAME="my-ai-service"export OTEL_DEPLOYMENT_ENVIRONMENT="production"
# Run your applicationshield360-instrument python app.py
Replace:
YOUR_NEWRELIC_LICENSE_KEYwith the API Key value you copied in Step 1.- Example:
api-key=acxxxxxxxx
- Example:
Refer to the Shield360 SDK configuration reference for more advanced configurations and use cases.
3. Import the pre-built Dashboard
- Go to one.newrelic.com > Dashboards.
- In the top-right corner, click Import dashboard.
- Copy the dashboard JSON provided in the accordion named
Dashboardbelow. - Paste the dashboard JSON text directly into the text area.
- Choose the account and permission settings for the dashboard. You can’t change the account once you’ve set it, but you can change the permissions at any time.
- Click Import Dashboard.
Dashboard
{ "name": "GenAI Observability", "description": null, "permissions": "PUBLIC_READ_WRITE", "pages": [ { "name": "GenAI Observability", "description": null, "widgets": [ { "title": "", "layout": { "column": 1, "row": 1, "width": 4, "height": 2 }, "linkedEntityGuids": null, "visualization": { "id": "viz.markdown" }, "rawConfiguration": { "text": "# GenAI Observability Dashboard\nThis dashboard displays the usage of Large Language Models (LLM) and Vector Databases, tracking OpenTelemetry Traces and Metrics sent using [Shield360](https://shield360.ai)." } }, { "title": "", "layout": { "column": 5, "row": 1, "width": 4, "height": 2 }, "linkedEntityGuids": null, "visualization": { "id": "viz.billboard" }, "rawConfiguration": { "facet": { "showOtherSeries": false }, "nrqlQueries": [ { "accountIds": [ 4060909 ], "query": "SELECT count(`gen_ai.total.requests`) AS 'Total Successful LLM Requests' FROM Metric WHERE `telemetry.sdk.name` = 'shield360'" } ], "platformOptions": { "ignoreTimeRange": false } } }, { "title": "", "layout": { "column": 9, "row": 1, "width": 4, "height": 2 }, "linkedEntityGuids": null, "visualization": { "id": "viz.billboard" }, "rawConfiguration": { "facet": { "showOtherSeries": false }, "nrqlQueries": [ { "accountIds": [ 4060909 ], "query": "SELECT count(`db.total.requests`) AS 'Total Successful VectorDB Requests' FROM Metric WHERE `telemetry.sdk.name` = 'shield360'" } ], "platformOptions": { "ignoreTimeRange": false } } }, { "title": "Top GenAI Models by Usage", "layout": { "column": 1, "row": 8, "width": 6, "height": 6 }, "linkedEntityGuids": null, "visualization": { "id": "viz.bar" }, "rawConfiguration": { "facet": { "showOtherSeries": false }, "nrqlQueries": [ { "accountIds": [ 4060909 ], "query": "SELECT count(`gen_ai.total.requests`) FROM Metric FACET `gen_ai.request.model` WHERE `telemetry.sdk.name` = 'shield360' LIMIT 10" } ], "platformOptions": { "ignoreTimeRange": false } } }, { "title": "GenAI Requests by Platform", "layout": { "column": 7, "row": 8, "width": 3, "height": 3 }, "linkedEntityGuids": null, "visualization": { "id": "viz.pie" }, "rawConfiguration": { "facet": { "showOtherSeries": true }, "legend": { "enabled": true }, "nrqlQueries": [ { "accountIds": [ 4060909 ], "query": "SELECT count(`gen_ai.total.requests`) AS 'GenAI Requests by Platform' FROM Metric FACET `gen_ai.system` WHERE `telemetry.sdk.name` = 'shield360' LIMIT 5" } ], "platformOptions": { "ignoreTimeRange": false } } } ] } ], "variables": []}